
This article is for people who:
– Stops when the code changes
– Unable to smoothly change chords
In the previous article, I explained the basics of chord changes.
In this article, we will explain things to be careful about chord changes when actually playing a song.
This article is an applied version of the previous article, so if you haven’t seen the previous article yet, please start from the previous article.
Tips and practice methods for changing guitar chords
Here, I will write down some things to keep in mind when playing 8-beat songs.
If you don’t know how to play an 8-beat song, please take a look at this article first.
How to play the guitar: Basic pattern of how to move the right hand (8 beat stroke basics B)
(1) Practice method
The basics, as in the previous article, is to be able to play in time with the metronome.
The practice method is as follows.
・Keep the rhythm constant and try playing along with the metronome.
・Try playing one chord for each 8-beat stroke pattern.
As an example, let’s take the following chord progression.
|C|G|Am|Em|
Ultimately, I aim to be able to play at the following tempo.
This tempo is an average tempo, so with a little practice you’ll be able to play faster songs fairly quickly.
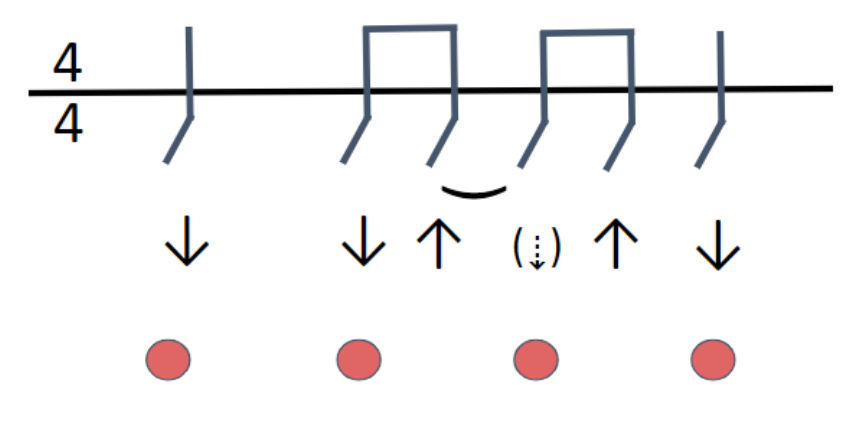
This is the pattern of this 8 beat stroke. The metronome click position is indicated by a red circle.

First, aim to play at the following speeds. (bpm=60)
Four clicks of the metronome constitute one division (one measure).
Now, set the metronome to bpm=60 and try playing.
Chord progression: |C|G|Am|Em|
You can use a metronome app, but I will also post a link to the web page “Web Audio Metronome.”
(If you don’t know how to use it, I will explain it in the previous article)
Tips and practice methods for changing guitar chords
Once you can play at bpm=60 without stopping, gradually increase the tempo until you can finally play at bpm=120.
For example, after bpm=60, bpm=70, if you can play at bpm=70 without stopping, then bpm=80, and so on.
(2) Tips for chord changes
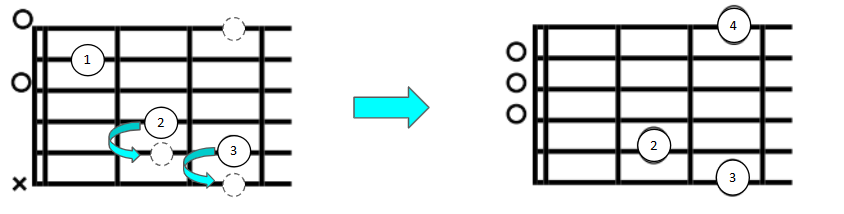
i) Prepare a little before the code changes.
The chord progression is also explained using |C|G|Am|Em|.
The image is that you release your left hand from the part marked in red before the chord change and start playing the next chord.
You won’t hear the correct chord in the red frame, but don’t worry about it and try playing it. (It is more important to play in time with the metronome)
If bpm=120 and you release your left hand at the red frame and play the next chord, the result will be as follows.
As you get used to it, you will be able to change chords while holding the chord in the red frame.
ii) Be aware of the similarities with the following code
As I introduced in the previous article, for example, when you go from C to G, you can see that the middle finger and ring finger are moved to the upper string in the same way.
In this way, if you keep in mind the similarities with the following code, you will be able to navigate smoothly.
iii) You will be able to play the chords that appear in the song you want to play without looking at your left hand.
As I introduced this in a previous article, if you can play without looking at your left hand, chord changes will go more smoothly.
If you’re having trouble making chord changes, I think it’s a good idea to start by memorizing the chords so you can play them without looking at diagrams.